Trilho de guindaste КР-80 GOST 4121-96 é um tipo de trilho de guindaste que é especificado pelo GOST 4121-96 standard na Rússia. Possui perfil e dimensões específicas que o tornam adequado para uso em trilhos de guindastes, que exigem alta capacidade de suporte de carga e resistência ao desgaste e à fadiga. Deixe-me saber se você tiver quaisquer outras perguntas sobre isso.
A especificação do trilho do guindaste КР-80 GOST 4121-96 como segue:
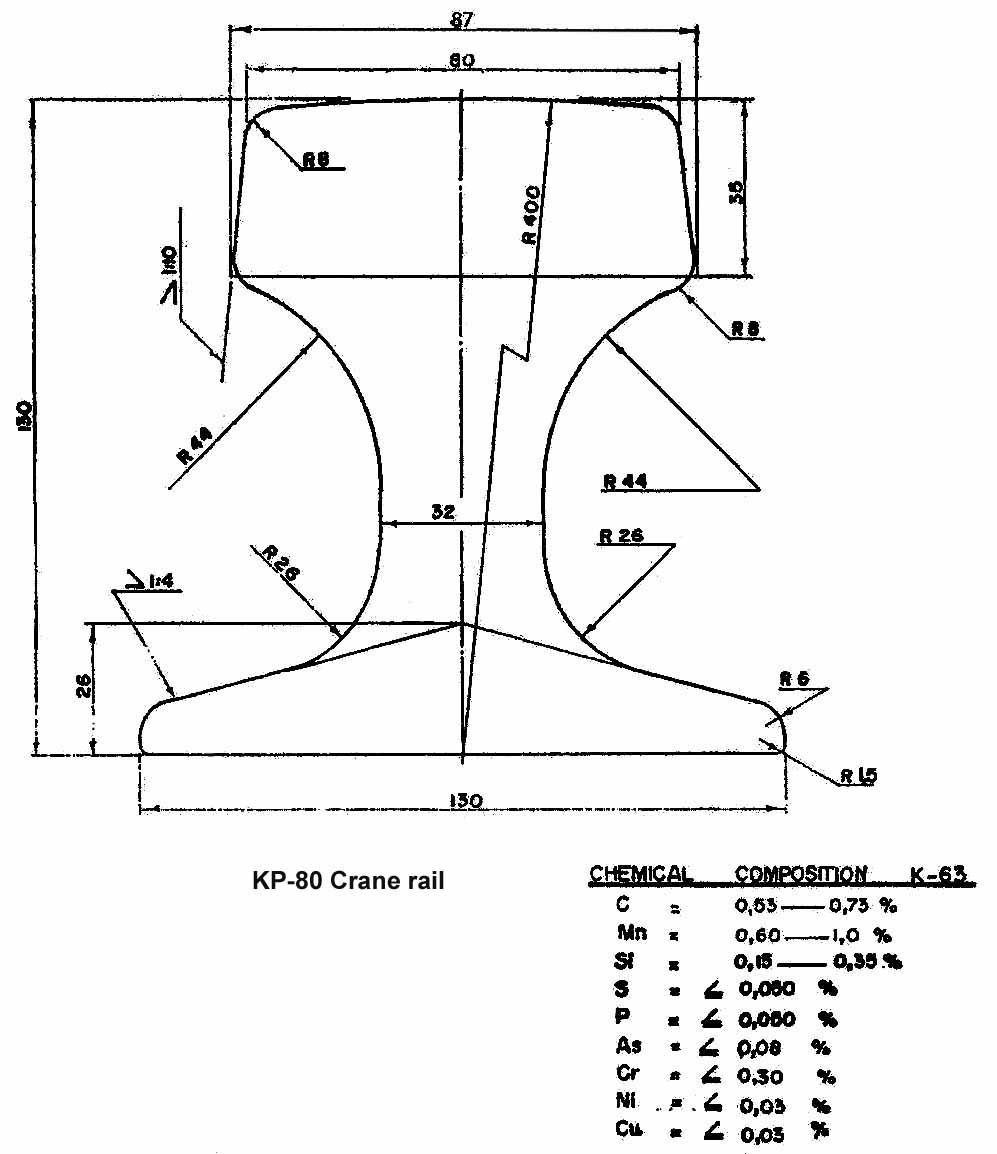
– O trilho tem um peso nominal de 63.69 kg/m.
– The overall height of the rail is 130 milímetro.
– The width of the head or flange is 80 milímetro.
– The width of the foot or base is 130 milímetro.
– The thickness of web is 32 milímetro.
– The length of the rail is 12 Metros.
These dimensions and properties make the Crane rail КР-80 GOST 4121-96 suitable for use in heavy-duty crane tracks, where it can provide high strength and durability while supporting heavy loads.
The Crane rail КР-80 GOST 4121-96 is most commonly used in Russia and other countries that follow Russian and Soviet Union standards. Contudo, this type of crane rail is also used in other countries worldwide, particularly in applications that require heavy-duty crane tracks. These applications may include port terminals, airports, Instalações de fabricação, and other industrial sites where large cranes are used to transport heavy loads.
The installation of crane rails is a complex process that requires specialized knowledge and equipment. Here are some general steps for installing crane rail:
1. Preparar o site: Clear the area where the crane rail will be installed of any debris and level it with a concrete base. Ensure that the base is strong enough to support the weight of the crane and the loads it will carry.
2. Lay out the crane rails: Position the crane rail sections along the concrete base in the intended location, following the design drawings and specifications.
3. Install anchor bolts: Drill holes into the concrete base at regular intervals and insert anchor bolts. Tighten the bolts to secure the crane rail sections to the base.
4. Connect rail sections: Join the rail sections by welding or bolting. Ensure that the joint is smooth and level.
5. Test the installation: Test the crane rail installation by running the crane along the tracks. Check for any unevenness or wobbling.
6. Regular maintenance: Regularly inspect and maintain the crane rail installation to ensure that it is safe for use.
It is important to note that these steps are only a general guide, and the actual process may vary depending on the specific application and technical requirements. It is recommended to consult with a qualified engineer or crane rail manufacturer for detailed installation instructions.
Nós podemos fornecer os trilhos de fundo plano padrão internacional como abaixo, se você precisar, por favor, sinta-se livre para nos perguntar: